Projectors are designed to deliver large, immersive images, transforming any space into a theater or presentation area. However, one common issue that users face is when the projected image appears bigger than the actual screen. This can result in cropped visuals, distorted edges, and a poor viewing experience. Understanding why the projector image exceeds the screen size and how to fix it is essential for achieving optimal image quality.
In this guide, we will explore the reasons behind an oversized projector image, the role of projector screen size, and the adjustments you can make to ensure your projection fits perfectly.
Understanding Projector Screen Size
The projector screen size refers to the diagonal measurement from one corner of the screen to the opposite corner. It is critical to select a screen that matches your projector’s capabilities and throw distance. When the image exceeds the projector screen size, it often indicates an issue with projector placement, zoom settings, or aspect ratio alignment.
Common Reasons the Projector Image Appears Too Large
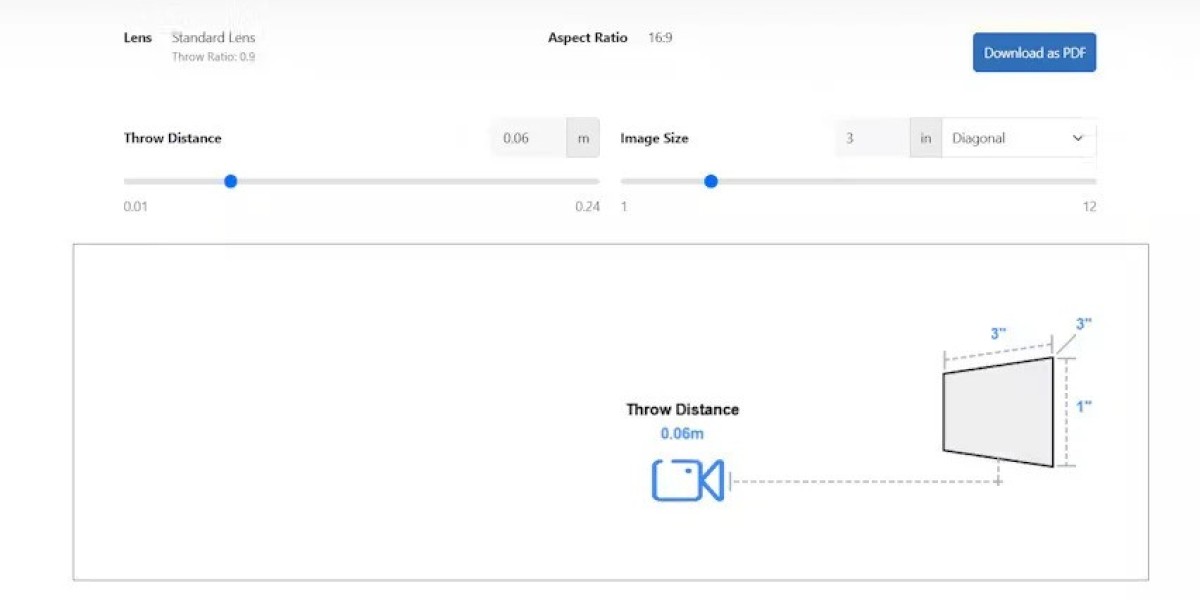
1. Incorrect Throw Distance
Every projector has a specific throw ratio, which is the relationship between the distance from the projector to the screen and the width of the projected image. If the projector is placed too close or too far from the screen, the image may exceed the screen size. Too far, and the image spills over the edges; too close, and the image may be smaller than expected. Calculating the correct throw distance based on your projector screen size is essential for proper image alignment.
2. Improper Zoom Settings
Most projectors feature an optical or digital zoom function that allows users to adjust image size. If the zoom is set too high, the projected image can surpass the screen boundaries. Always adjust the zoom gradually while checking the fit on the screen. Avoid using excessive digital zoom, as it may degrade image quality.
3. Mismatched Aspect Ratio
An aspect ratio mismatch occurs when the projector output does not match the screen’s format. Common aspect ratios include 16:9, 4:3, and 21:9. If a 16:9 projector output is displayed on a 4:3 screen, the image may be cropped or appear larger than intended. Matching the projector’s aspect ratio to the projector screen size prevents oversized projections and black bars.
4. Keystone Correction Overuse
Keystone correction allows users to adjust the image to compensate for projector tilt or off-center placement. However, excessive keystone adjustment can stretch the image, making it larger than the screen. It is best used sparingly, combined with proper projector placement to achieve the correct fit.
5. Lens Shift or Projection Angle
If the projector is positioned at an angle or offset from the screen, the image may distort and appear bigger. Lens shift can help adjust vertical or horizontal placement without physically moving the projector, but improper use can contribute to oversized images.
6. Projector Calibration Issues
Incorrect brightness, contrast, or scaling settings can also make the image appear larger or distorted. Many projectors have factory presets, but calibration is necessary to match the projector screen size and room conditions accurately.
How to Fix an Oversized Projector Image
Step 1: Check Projector Placement
Refer to your projector’s manual to determine the recommended throw distance for your screen size. Move the projector closer or farther away as needed to ensure the image fits within the screen boundaries.
Step 2: Adjust Zoom Settings
Use the optical zoom to fine-tune the image. Slowly increase or decrease zoom until the image perfectly aligns with the edges of the screen. Avoid relying solely on digital zoom to prevent pixelation or reduced clarity.
Step 3: Match Aspect Ratio
Verify that the projector’s aspect ratio matches your screen. For widescreen content, select 16:9; for older content or presentations, select 4:3. Proper aspect ratio alignment ensures that the image fills the screen without spilling over or leaving black bars.
Step 4: Correct Keystone Carefully
If keystone correction is necessary, apply it minimally. Excessive adjustment can stretch the image, making it appear larger than the screen. Physical alignment of the projector is often more effective than relying on digital correction.
Step 5: Use Lens Shift Properly
Adjust lens shift to center the image vertically and horizontally without altering its size. Proper lens shift allows for precise alignment with the screen edges while maintaining the correct projection size.
Step 6: Calibrate the Projector
Display a test pattern or calibration grid to ensure the image fits perfectly. Adjust brightness, contrast, and scaling settings as needed to match the projector screen size and room lighting conditions.
Tips for Optimal Image Fit
Measure Screen Accurately: Knowing the exact projector screen size helps calculate the correct throw distance.
Control Ambient Light: Reduce surrounding light to improve image visibility and help gauge proper fit.
Use a High-Quality Screen: A matte white or ALR screen enhances clarity, making it easier to align the image.
Regularly Recheck Alignment: Projector placement can shift over time; periodic checks prevent oversized projections.
Avoid Extreme Angles: Keep the projector as perpendicular to the screen as possible for uniform image size.
Common Mistakes to Avoid
Placing the projector too far from the screen
Overusing digital zoom or keystone correction
Ignoring the aspect ratio of content and screen
Using low-lumen projectors in bright rooms, which can exaggerate visual distortion
Neglecting to measure and align the screen and projector precisely
Conclusion
An oversized projector image can be frustrating, but it is usually the result of incorrect placement, zoom settings, aspect ratio mismatches, or excessive keystone correction. By understanding your projector screen size, calculating the correct throw distance, and making careful adjustments to zoom, alignment, and aspect ratio, you can ensure that the projector image fits perfectly within the screen.
Proper setup not only enhances viewing quality but also provides a more immersive and professional experience for movies, presentations, or gaming. Taking the time to measure, calibrate, and adjust your projector ensures that every image is crisp, clear, and properly contained within your screen.
Read more: https://audiovisual.hashnode.dev/what-is-the-best-projector-screen-size-for-your-room


